
#
Workflow
#
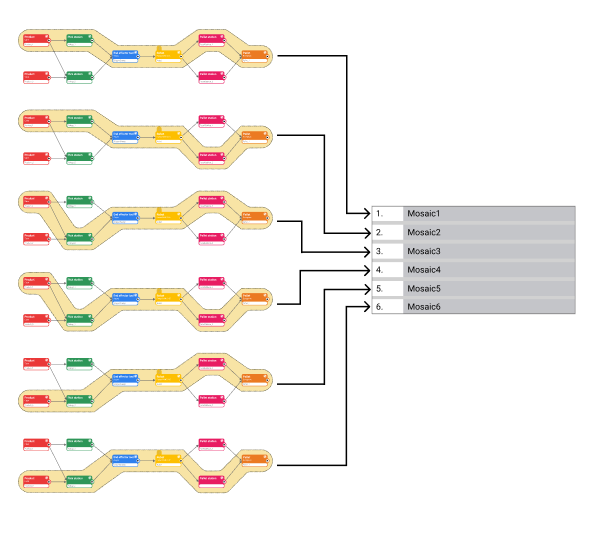
Selection of configuration to create the mosaic
#
Steps
Click on the Next button, located at the top right.
In the side menu, click on new tile. When you place the mouse over the name of a path, the line to which it corresponds lights up in orange.
The different paths in which the mosaic is edited and code is generated will determine the recipes that will be loaded into the robot. These recipes will be executed by the PLC in the execution cycle by means of each recipe identifier number.
The lines that have a tile created appear in green color and two buttons, one to delete the tile and the other to edit it. If code has been generated, when you move the mouse over the tile, the name of the program associated with the tile appears at the bottom of the side menu.
Each path represents a recipe or robot program.
The deletion of a node or a link between nodes, means that all the recipes that used the deleted element, will be inaccessible and therefore it will not be possible to edit its mosaic or generate code. Recipes in this situation are called orphan recipes.
#
Obtaining coordinates
The coordinates to be inserted in the software must meet the following requirements:
- They will always be in World/Base coordinates of the robot.
- The robot's World/Base coordinate system will not be altered.
- It shall not have reference planes/frames that alter the data obtained.
- The reference system of the tool (TCP) must be the reference one, centered on the robot flange.
- The flange must be parallel to the coordinate system.
- The reference element used during data acquisition must be centered on the robot flange and perpendicular to the reference system (no inclination).
- The data to be taken will be the Cartesian coordinates X, Y, Z and Rz. The latter being the rotation of the axis integrated in the flange, which will be parallel to the ground.
- For safety reasons, the displacement of the robot will be in the manual mode integrated in the controller, and at reduced speed.
- Once the robot has been positioned in the desired location, the coordinates will be obtained in the corresponding section of the controller interface (Teach).